Introduction
This tutorial will guide you through setting up a social network using WordPress, BuddyPress and WooCommerce. In the end, you’ll be able to offer paid membership subscriptions with premium content. Specifically, the social network will:
- Create a monthly membership product with automatic recurring billing.
- Require customers to pay for a monthly subscription to gain access to BuddyPress pages.
- Provide the ability to limit content (posts or pages) to paying members.
- Allow members to manage (cancel) their membership subscription from inside their BuddyPress profile.
- Allow past members to re-purchase a subscription from their profile.
Ingredients
- WooCommerce Version 2.0.12
- BuddyPress Version 1.8 (first world problem, for reals yo)
- WooCommerce Subscriptions Version 1.3.8
- Groups Version 1.3.11
- Groups WooCommerce Version 1.4.0
- WooCommerce Stripe Version 1.5.12
- Buddy Theme
Install WordPress
We’re starting with a nice clean install of WordPress. Incidentally, I’m using the awesome DesktopServer from ServerPress.com to set this up.
Name your new WordPress website whatever you’d like. For this article, I’m creating a local site named paid-social.dev using DesktopServer.
Update WordPress Settings
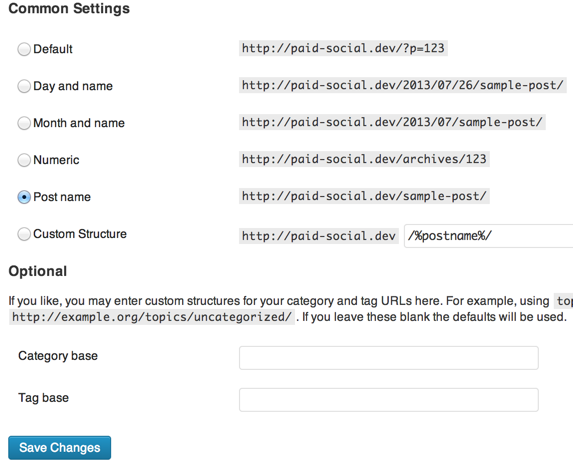
Jump into WordPress -> Settings -> Permalinks. Change the settings to Post Name and save.
For my sanity, I like to disable the media date directories in WordPress -> Settings -> Media.
Install Buddy Theme & Child Theme
Purchase and download the Buddy WordPress theme. Place this theme in your WordPress themes directory. While you’re there, go ahead and create another folder named “buddy-child”, cuz we’re going to use a child theme.
If you’re not familiar with child themes, they give you the ability to use all the features of a given WordPress theme without having to change the actual theme files. Why? So that Hell doesn’t break loose when you upgrade your theme. You can read more about child themes here.
Setup Child Theme and Activate
Now we need to add the required stylesheet to the buddy-child directory so that we can activate the child theme.
Create a file named style.css and save it to your buddy-child directory. To start, the contents of the file should look like this:
/*
Theme Name: Buddy Child
Template: buddy
Version: 1.0
Description: Child theme for Buddy
Author: Joey Rudisill
Tags: buddypress
*/

@import url("../buddy/style.css");
After saving the style.css file, jump into WordPress -> Appearance -> Themes. Activate the Buddy child theme.
The Buddy theme should have created a new page named “Homepage” and updated your WordPress settings accordingly. But let’s just make sure that’s true.
If you started from a fresh WordPress install and followed this tutorial, you should have a new page named “Homepage” in WordPress -> Pages -> All Pages. If not, you can either create the page or troubleshoot the issue.
Navigate to WordPress -> Settings -> Reading. Make sure that “A static page” is selected and “Front page” is set to Homepage.
Install and Activate the BuddyPress Plugin
Download the plugin through your WordPress admin and activate it. After doing so, go directly to the BuddyPress settings: WordPress -> Settings -> BuddyPress.
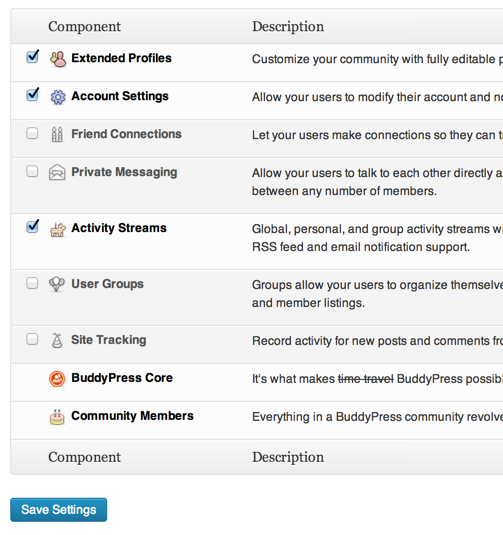
We want to keep things as simple as possible, so check out the images for BuddyPress Components, Pages, Settings.
Note: The Buddy theme seems to generate an error if the BuddyPress Activity component isn’t enabled. So make sure it’s set appropriately.
Note: After saving all settings, go back to WordPress -> Settings -> Permalinks and simply click Save Changes. Why? Well, because it resets the permalinks to a “fresh” state after installing these major components. You can run into some very mysterious problems if you skip this step. It’s a good practice to save the permalinks after each plugin install.
Note: There’s a very good chance you’ll need to make a quick fix at this point due to a small bug in the Buddy theme: it incorrectly sets the default user login page. You can see evidence of the problem if you visit your site with a browser that’s not logged in, click the login button in the upper right corner, arrive at page not found. The fix is simple.
Navigate to Appearance -> Theme Options -> BuddyPress Settings.
In the Login URL field, change “http://paid-social.dev/login-page-example” to “http://paid-social.dev/login-page”. Of course, substitute “paid-social.dev” with your domain.
Click Save Changes.
As you’ll probably see, there are many more theme options. We won’t be changing any of them at this time.
Install and Activate WooCommerce
Download the WooCommerce plugin from the WordPress admin. Activate the plugin.
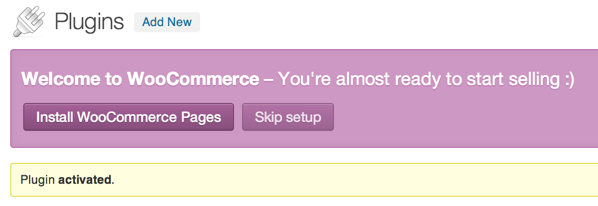
Install the WooCommerce page as prompted by the huge purple banner.
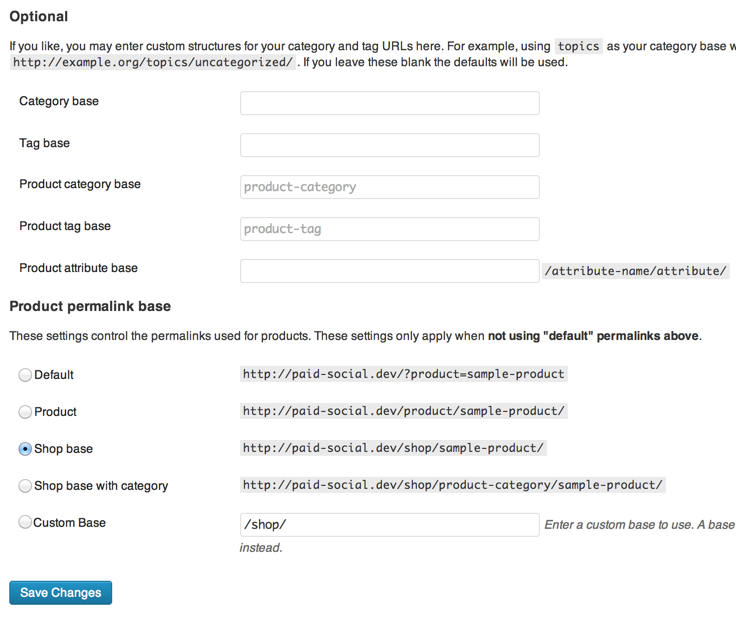
Jump back over to WordPress -> Settings -> Permalinks where you’ll find some additional settings after the WooCommerce installation. I’m going to change one setting: I’m setting Product permalink base to Shop base. Save.
WooCommerce General Settings
Now we’re going to configure some of the WooCommerce settings. Navigate to WordPress -> WooCommerce -> Settings.
Change the General Options as appropriate (currency and whatnot).
Leave the rest of the settings at their default except for the Cart, Checkout and Accounts sections (see screenshot).
- You can leave coupons enabled, but we won’t be setting them up in this tutorial.
- You could leave the customer note field checked, but I’m unchecking it for this tutorial, only because I don’t like the resulting page layout of the checkout form.
- We want to disable guest checkout because we’re building a paid membership site (even though the forthcoming Subscriptions plugin will take care of this for us).
- Uncheck “Force secure checkout”. Why? Because we want to get everything else setup before we start dealing with SSL. See, forcing a secure checkout (meaning, forcing SSL) introduces a number of potential issues that we don’t want to deal with just yet. Mainly, you tend to run into redirect issues between WordPress, WooCommerce, your host provider, htaccess files, whatever. So aside from the fact that this tutorial won’t walk you through obtaining and setting up an SSL certificate, solving SSL redirect issues can only be addressed on a case-by-case basis. Don’t worry, you’ll get the whole SSL thing solved and you’ll come back and change this setting. But set this one on the back burner.
- We only want to allow registration during the purchase process, so disable that setting.
- Personally, I don’t think my new members want their email address broadcast as their username, so I’m disabling that option.
- I don’t want members in my WP admin; I don’t want them hanging onto a shopping cart; I don’t want them repurchasing from their account page (for now).
Save your settings.
WooCommerce Catalog Settings
Navigate to the Catalog tab.
- Under Catalog Options, check the “Redirect to cart…” option.
- Uncheck the AJAX option (for now).
- Under Product Data, uncheck all of the weight and dimension fields.
- Set the remaining options however you see fit.
Save changes.
WooCommerce Page Settings
WooCommerce Inventory Settings
Navigate to the Inventory tab.
- Disable stock management cuz we’re not managing it.
- Disable the two stock notification settings.
Save changes.
WooCommerce Tax Settings
By default, the tax settings should be disabled. I’m leaving them that way because I don’t like taxes. And because it’s a complicated topic.
WooCommerce Shipping Settings
Navigate to the Shipping tab.
- Uncheck “Enable Shipping” because we’re not shipping anything.
- Uncheck “Enable the shipping calculator on the cart page” for good measure.
Save changes.
In the remaining shipping sub-tabs, all should be disabled except free shipping. I’m leaving it checked, for now.
WooCommerce Payment Gateways Settings
Navigate to the Payment Gateways tab.
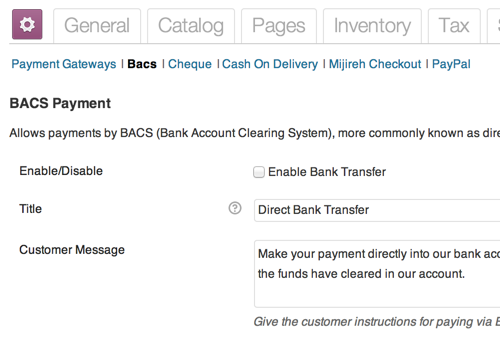
When you first arrive, a few payment gateways will be enabled. We’re going to disable all of them. So for each gateway, click it, uncheck its corresponding “enable” box, save the settings, move to the next. See screenshot for example.
Note: Be sure to save the settings after changing each payment gateway.
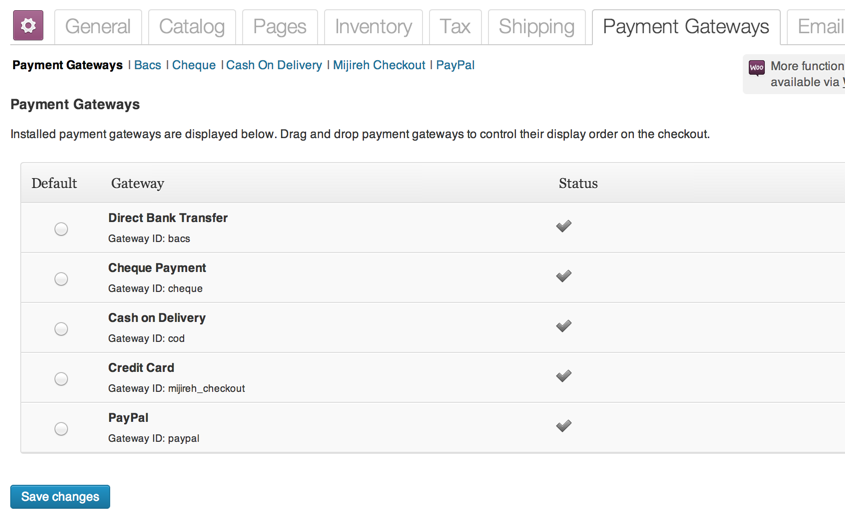
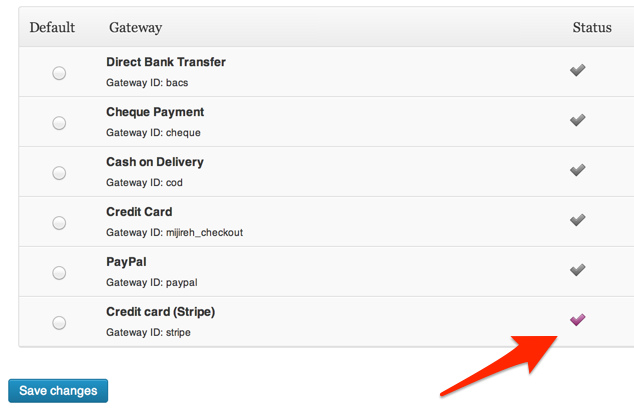
Navigate back to the main Payment Gateways tab. It should look like the screenshot.
WooCommerce Email Settings
Navigate to the Email tab.
For our purposes, we’re going to leave all of the email options at their default (enabled), except one.
Navigate to the “Completed Order” sub-tab.
Change “Subject (downloadable)” to simply read “Your {blogname} order from {order_date} is complete.” Why? Later, we’re going to set an option that will force orders to a “complete” state. Subsequently, WooCommerce ends up sending this email message even though we’re not downloading files. It’s a WooCommerce quirk. So we don’t want the email subject to contain language referring to downloadable files.
Change “Email Heading (downloadable)” to “Your order is complete” for the same reason stated above.
WooCommerce Integration Settings
Navigate to the Integration tab.
We’re going to ignore ShareThis and ShareYourCart. They’re disabled by default.
At this point, you can setup Google Analytics. I suggest you download and activate Yoast’s Google Analytics for WordPress. Also, you can setup your Google Analytics tracking to include eCommerce transactions, which is hugely beneficial to your business. Rather than guide you through that process here, we have an extensive tutorial here.
Install and Activate WooCommerce Subscriptions
WooCommerce Subscriptions is an awesomely powerful plugin and gives us the ability to automatically charge customers for membership. So go purchase the WooCommerce Subscriptions plugin from WooThemes.com and download, install and activate it.
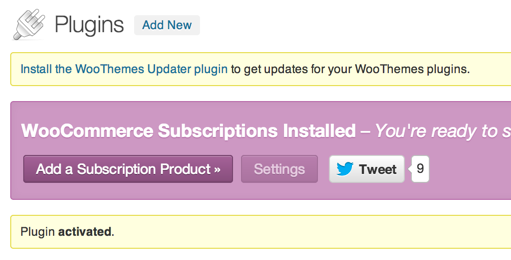
Upon activating the plugin, you’ll be prompted to add a subscription product. We’re going to hold off on that until later.
You’ll also be prompted to install the WooThemes Updater plugin. You can go ahead and install the plugin if you wish. It’s a simple installation.
WooCommerce Subscriptions Settings
Navigate to WooCommerce -> Settings -> Subscriptions.
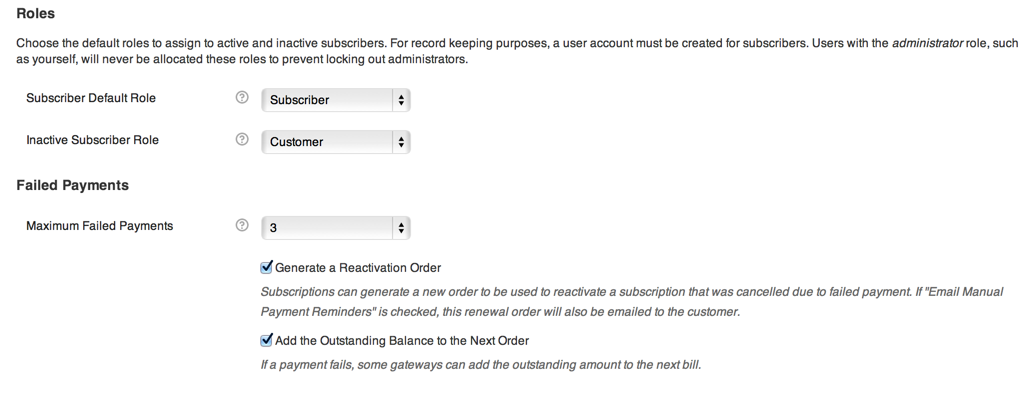
- Subscriber Default Role: leave this setting as Subscriber. When a new user buys a membership to our social network, they’ll be assigned to this Subscriber role, which will indicate they are an active, paying member.
- Inactive Subscriber Role: leave this setting as Customer. When a user cancels their subscription, they’re no longer a paying member, but they’re still in the system. Those users will be transferred to the Customer role. We’ll want to allow these individual to login to their account profile and give them an opportunity to re-subscribe. They will not be able to access the premium content while they’re in the Customer role. But once they re-subscribe, they’ll be moved back into the Subscriber role and again have access to premium content.
- Under Failed Payments, check the “Generate a Reactivation Order” and the “Add the Outstanding Balance to the Next Order” boxes. Explanations are listed next to those boxes.
- Under Renewals, uncheck “Accept Manual Renewals”. At this point, we’re not going to allow our members to manually renew; meaning, our subscribers will be put on an auto-renew plan rather than having to click a button to renew each week/month/year/whatever.
- Uncheck “Email Manual Payment Reminders”. We’re not allowing manual renewals, so we don’t need to email the payment reminders.
- Uncheck “Email Automatic Renewal Orders”. We’re un-checking this for this tutorial; however, you might consider checking this box. The question is: do you want your customers receiving a receipt every time their membership renews?
- Under Miscellaneous, set “Allow Customer Suspensions” to zero. For this article, we’re not going to allow our members to manually suspend their membership. Keep in mind, suspending an account is not the same thing as canceling an account. A suspension means to “put on hold”. A cancellation requires the individual to re-purchase a membership.
Save changes.
Install and Activate Groups
Groups gives us the ability to create a group and assign permissions (capabilities) to that group. This works much like WordPress roles and capabilities. Shortly, we’ll create groups and capabilities for our social network.
In the WordPress admin, download, install and activate the Groups plugin by itthinx.
Install and Activate Groups WooCommerce
Groups WooCommerce takes the features of Groups and allows us to tie them to products during checkout. This will become clear when we setup our first product.
You’ll have to purchase the Groups WooCommerce plugin from WooThemes.com. Download, install and activate the plugin.
Groups WooCommerce Settings
Navigate to WooCommerce -> Groups.
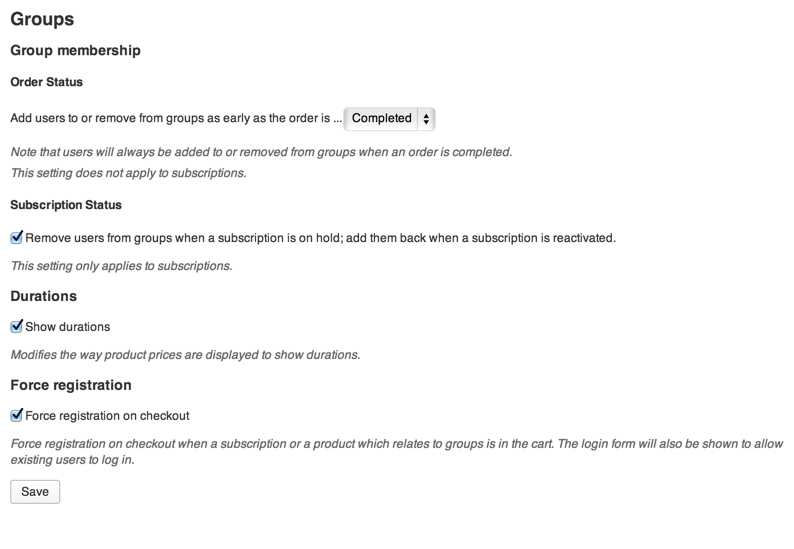
All settings should be left at their default. Look at the screenshot for verification.
- The Order Status drop-down indicates that we want to assign users to the appropriate group as soon as their purchase is complete. This setting is not quite as straightforward as it sounds. In WooCommerce, completed purchases for subscriptions can be marked as either Processing or Complete. Both of these states indicate a completed purchase. But under certain conditions, a shop owner might want to leave the status as Processing. For our purposes, we want to use Complete instead of Processing (more on this when we set up a product). Thus, we want this drop-down box set to Complete.
- The Subscription Status box indicates that we want to move users in and out of their appropriate groups depending on their subscription status. Leave this checked.
- The Durations checkbox should be checked. Honestly, I haven’t tested the impact of this option.
- Make sure that “Force registration on checkout” is checked. As implied, this forces the user to register during checkout for any product that that assigns Groups – which ours will.
Save the settings.
Groups Capabilities Settings
The first step in setting up Groups is to setup the capabilities. For this tutorial, each capability will be assigned to one Group.
Navigate to Groups -> Capabilities.
Click New Capability.
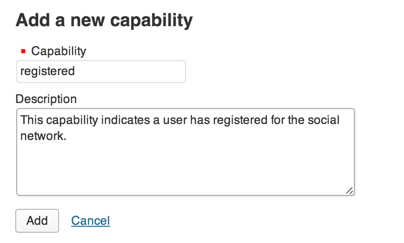
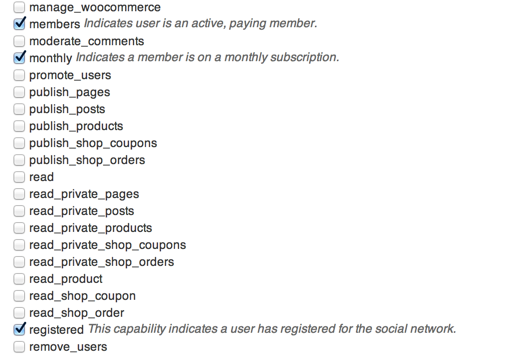
Create a capability named “registered” (see screenshot). This capability indicates that a user has registered and resides in our WordPress users database. It does not indicate that the user is a paying subscriber.
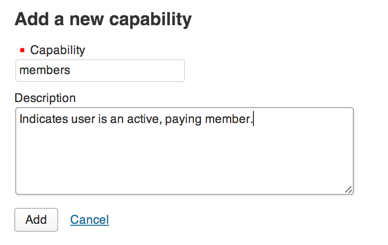
Follow the same process to create a capability named “members”. This capability indicates that not only has our user registered, but they are also a paying member.
Follow the same process to create a capability named “monthly”. This capability indicates that our member is on a monthly membership program.
Groups Groups
Next we’ll create Groups and assign capabilities them. These Groups will then be assigned to our product, once it’s created.
Navigate to Groups -> Groups.
You should have one Group listed by default: “Registered”. Check the box for the Registered Group; in the drop-down box labeled “Apply capability to selected groups”, select “registered”; click the Add button.
The table should now look like the second screenshot.
Now create a new Group by clicking the New Group button at the top of the page.
Name the Group “Members” and set the parent to “Registered” (see screenshot). Save.
Repeat the process for adding the “members” capability to the “Members” group (check the box, select the drop-down, click add).
Now create a new Group named “Monthly” and set the parent to “Members”. Save.
Repeat the process for adding the “monthly” capability to the “Monthly” group (check the box, select the drop-down, click add).
Your table should now look like the last screenshot.
Groups Options
Navigate to Groups -> Options.
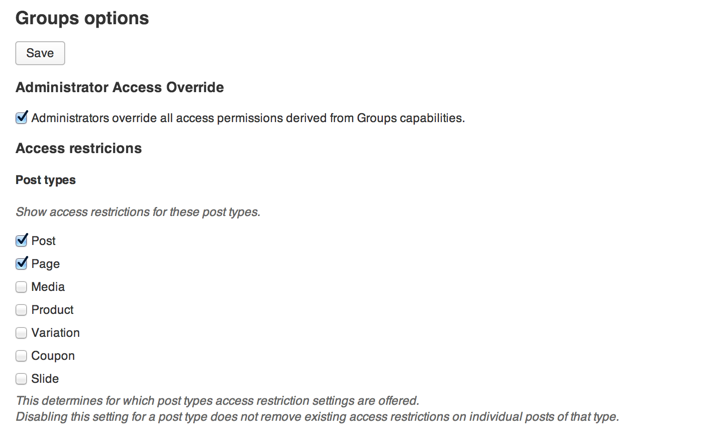
Under Post Types, remov all checkboxes except Post and Page. This indicates that when editing a post or a page, we’ll have the option to restrict the post/page to certain capabilities. You can, of course, leave the other boxes checked. But it’s unlikely you’ll need to restrict those items to certain members.
Under the Capabilities section, scroll through the list and select members, monthly, and registered. These three capabilities will show as options when editing a post or page, allowing us to restrict access to those posts/pages.
Under the User Profiles section, make sure that “Show groups in user profiles” is checked. This can be helpful information when viewing the WordPress user admin page (WordPress -> Users).
Under Tree View, make sure “Show the Groups tree view” is checked. This will allow us to organize our Groups into parent-child relationships.
Install and Activate the Stripe Plugin
Stripe is pretty awesome. It’s a robust and user friendly payment gateway that you can setup in minutes. Yes, the fees are a bit higher, but users seem to be saying it’s worth the price.
You’ll have to purchase the WooCommerce Stripe plugin from WooThemes.com. Download, install and activate the plugin.
Jump over to Stripe to setup a free account. You’ll find a Sign up link at the top of the page. The sign up process couldn’t be easier, so go ahead and just follow their lead.
Note: If you run multiple businesses through Stripe, you’ll need to setup multiple Stripe accounts. This is Stripe’s recommended approach as they don’t offer a multi-account view at this time.
After you’ve setup your Stripe account, confirm that you’re dealing with Stripe’s test data by looking at the little toggle switch (see screenshot).
Note: It might seem that the Live/Test toggle switch changes the Stripe environment, but it doesn’t. You can actually run test transactions and live transactions through Stripe at the same time. The toggle switch merely determines whether to display live or test data in the transaction history. Talk about user friendly! If you’ve dealt with PayPal’s horribly cumbersome sandbox, you’ll appreciate the experience on Stripe.
While still on the Stripe website, navigate to Your Account -> Account Settings -> API Keys. There you’ll find four API keys, which you’ll need for your WooCommerce settings. If Stripe asks for additional information to obtain the keys, just follow the directions.
In a new browser tab, jump back over to WooCommerce -> Settings -> Payment Gateways -> Stripe and enter the four corresponding API keys into the appropriate fields. Alternatively, you can just enter the test API keys for now.
Change the remaining WooCommerce Stripe settings according to the following (see screenshot):
- Check Enable Stipe.
- Check Enable Test Mode.
- Check Capture charge immediately.
- Uncheck Enable Stripe Checkout. For our purposes, we’ll use the standard WooCommerce checkout form to submit the credit card data to Stripe. Later on, you might want to play with Stripe Checkout.
Save your settings.
Note: When you enable Stripe, you’ll start seeing a message about SSL being disabled (see screenshot). This is annoying, but fine for now. Once you get your social network and SSL certificate setup, you can go back to WooCommerce -> Settings and change the “Force secure checkout”. Keep in mind, you will likely have some redirect issues pop up as a result of forcing SSL. These issues can only be addressed on a case-by-case basis.
Back on WooCommerce -> Settings -> Payment Gateways, Stripe should be the only active gateway, indicated by the purple checkmark (screenshot).
For good measure, navigate to WordPress -> Settings -> Permalinks and click Save Changes. Am I obsessive about this? Maybe a little. But I’ve had many issues resolved by following this step.
WooCommerce New Product Setup
We’re finally ready to setup our first subscription product. Navigate to Products -> Products. Click Add Product.
In the Product Name field, type “Monthly Subscription”. Why? Because we’re setting up each subscription period to be a separate product. Yes, it’s possible to get fancy with product variations, but we’re keeping it simple.
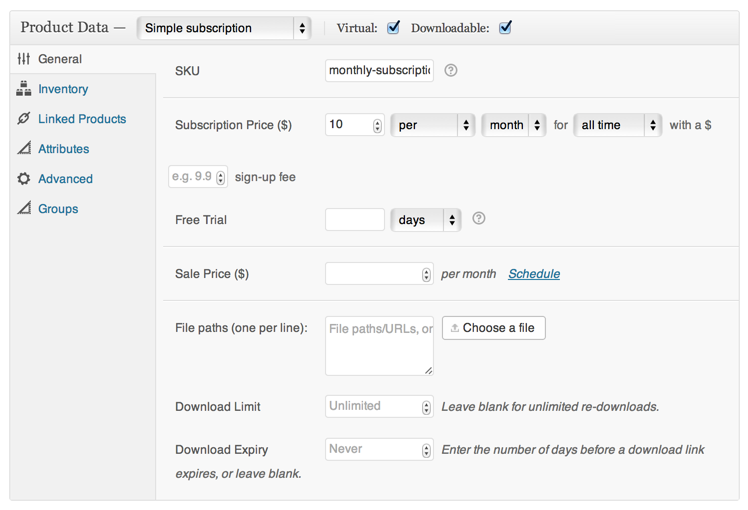
Scroll down to the Product Data setup box and take a look at the first screenshot. We’re setting up our product with the following General options:
- First, select Simple Subscription from the drop-down menu. You can play with variable subscriptions later.
- Next, check the Virtual and Downloadable boxes. Why? Well, we’re not selling physical products, so Virtual is easy enough to understand. But Downloadable? Yes. We covered this a bit earlier: when a successful order comes in, the transaction is either set to “Processing” or “Complete”. Despite those names, both indicate that the customer was charged. But I don’t like the word “Processing”. It confuses me when I look at my orders. Also, “Processing” will show up in the customer’s profile as well. It’s not intuitive. So the way you force the order to say “Complete” is by selecting the Downloadable field. Frankly, Woo needs to change this. Does it mean that the customer will be prompted to download something? Nope. They’ll never know they purchased a product that’s designated as “downloadable”. Their only indication would be if you failed to change the email subject that we discussed oh so long ago in this tutorial.
- In the SKU field, enter “monthly-subscription”. It’s actually not necessary right now, but you’ll appreciate it if/when you setup coupons and start looking at Google Analytics eCommerce transactions.
- Fill out the Subscription Price fields according to the screenshot. We’re setting up a monthly subscription for $10 per month that will continue to renew until cancelled.
- Leave the Sign-Up Fee empty for now.
- I’m going to leave the Free Trial empty for this tutorial; however, you might want to come back later and add a trial period. Bear in mind, things start getting a bit complicated with a free trial – e.g. charges don’t occur until after the trial period, even though your dashboard and Google Analytics will show otherwise; I’ve seen some inconsistent issues with PayPal and subscription trial periods; coupons can get dorked-up with trial periods; if someone cancels within the trial period, they’ll still have access to your membership area until the trial expires; some people will steal your premium content and cancel before the end of the trial period. My advice: get yourself on familiar ground with simple subscriptions before diving into trial periods (same goes for coupons).
- Leave Sales Price empty becase we’re not discounting this subscription at this time.
- The rest of the fields on this screen are for actual downloadable products. Leave them blank.
Scroll up on the page an click the Save Draft button.
Scroll back down and click the Inventory sub-tab. Leave the setting at In Stock.
Click the Advanced sub-tab (leave the others as they are: Linked Products, Attributes). For this tutorial, I’m unchecking “Enable reviews”.
Check the “Limit Subscription” box. We only want a single customer to have a single paid subscription.
Click the Groups sub-tab (see screenshot). Under the Add column, check the Members and Monthly boxes. We established these Groups in an earlier step of this tutorial. When a new customer signs up and pays for a membership, they’ll be added to the Registered, Members, and Monthly Groups. If the customer cancels his/her subscription down the road, the system is smart enough to remove them from these Groups. Remember: we created these Groups and we assigned each Group a capability. Once we actually create a new premium post (or any premium content), we can control access to that post by way of the capabilities.
Down the road, you might end up doing something with the “Remove” column. But leave it unchecked for now.
Scroll up and click Save Draft.
Scroll back down and add a featured image to represent your product. I’m adding an image from another website I run, Gotta Salsa.
Scroll down to the Product Short Description box. This will be the main description for your product and will appear next to your product’s image when a user is looking at a single product page (as opposed to browsing through all of your products). So include the most relevant and sales-y info in this box.
Click Publish.
Congratulations! You now have a monthly subscription product ready for purchase. Now let’s make the product available on the home page for easy access.
Navigate to WordPress -> Pages -> All Pages -> Homepage.
In the main content area, you’ll see several shortcodes that were added by the Buddy theme. Let’s add two more shortcodes to display the product we just created:
[clear]

[recent_products per_page="12" columns="2" orderby="date" order="desc"]
Save the page.
Note: You can also view the new product on the shop page: http://paid-social.dev/shop/ (replace domain with your own).
Create Premium Content
The next step is to create content that only your paying subscribers can view. There are many options:
- Restrict a post to paying subscribers.
- Restrict part of a post to paying subscribers.
- Restrict a page to paying subscribers.
- Restrict part of a page to paying subscribers.
- Restrict a media file to paying subscribers.
For this tutorial, we’re going to stick with a simple one: restrict a post to paying subscribers.
Navigate to WordPress -> Posts -> All Posts and click Add New.
In the Post Title, enter “My Premium Content”. Enter anything you wish in the post content field.
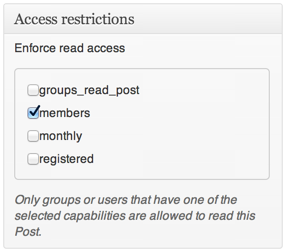
In the box labeled Access Restrictions, check “members” (see screenshot).
Note: The Access Restrictions box is displayed on our Edit Post screen because we asked Groups to show it on posts and pages. The items inside the Access Restrictions box are the capabilities we created and asked Groups to include (see the Groups Options and Groups Capabilities Settings sections).
Note: If you want to restrict only portions of the post instead of the entire post, you can read about the Groups shortcodes on the itthinx website.
You’ll notice that we are not checking the “monthly”, “registered”, or “groups_read_post” boxes. That’s because we’re not using those capabilities to restrict content at this time. Instead, we’re restricting content to “members”. And if you recall, an active paying subscriber belongs to the “Members” Group, which contains the “members” capability (see sections WooCommerce New Product Setup, and Groups Groups). Depending on your business needs, you can add additional capabilities down the road.
Publish the post.
Congratulations! You now have one premium post that is only available to your paying members.
Note: To test this, visit your site’s home page with a browser that IS NOT logged in vs. a browser that IS logged in as your admin. You’ll see different content in the Latest Posts box.
The Crossroads
At this point, you have a social network setup, you have a subscription product ready for purchase, and you have some content that is only viewable by paying subscribers. But you’re at a crossroads: do you want to charge for access to your social network or do you only want to only charge for certain premium pages/posts?
If the latter, you’re essentially finished with this tutorial. You should consider establishing Register and Activate pages for BuddyPress so that your users can sign-up for the social network without paying (see the Install and Activate the BuddyPress Plugin section that we covered earlier).
If you want to charge for access to the social network, continue with the tutorial.
Restrict Access to the Social Network
If you’ve followed this tutorial, you haven’t created a functions.php file for your Buddy child theme, so let’s do that. Save a file named functions.php to /wp-content/themes/buddy-child/functions.php
Now let’s add code to functions.php that will restrict access to the BuddyPress pages to paying subscribers only. This modification comes with some help from travel-junkie.
<?php

// Restrict access to buddypress pages
add_action( 'get_header', 'sh_walled_garden' );
function sh_walled_garden() {

	global $bp;

	// If the user is looking at a BuddyPress Register or Activate page, don't enforce wall
	if( bp_is_register_page() || bp_is_activation_page() ) {
		return;
	}

	//If the user is looking at a BuddyPress page and the user does not have the 'members' capability
	if( !bp_is_blog_page() && !current_user_can( 'members' ) ) {

		// Force a WP logout
		wp_logout();

		// Send the user to the login page
		bp_core_redirect( $bp->root_domain . '/login-page/' );

		// Always exit() after redirect
		exit();
	}
}

?>
Restrict Access to WooCommerce “My Account” Pages
In order for our WooCommerce “My Account” pages to work the way we want with BuddyPress and Groups, we’ll need to add some appropriate restrictions.
Navigate to WordPress -> Pages -> All Pages.
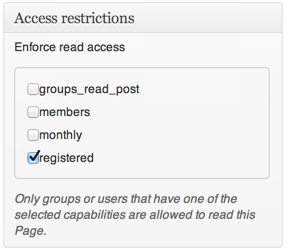
Edit each of the following pages and add an Access Restriction of “registered” (see screenshot). Save each page.
- My Account
- Edit My Address
- View Order
Login Redirect
When a paying member logs in, they’ll be directed to the page they were either on or trying to access. But when a registered user (i.e. a person who was once a paying member but since cancelled) tries to log in, we want to always direct them to the WooCommerce My Account page, giving them an opportunity to re-subscribe.
Add the following code to your Buddy child theme’s functions.php
// Redirect user to the appropriate page on login
add_filter( 'login_redirect', 'custom_login_redirect', 10, 3 );
function custom_login_redirect( $redirect_to, $request, $user ) {

	// If trying to log into the WordPress admin, get out of the way
	if( ( false !== strpos($redirect_to, 'wp-admin') ) && ( false !== strpos($request, 'wp-admin') ) ) {
		return $redirect_to;
	}

	// If the user failed to authenticate, get out of the way
	if( is_wp_error( $user ) ) {
		return $redirect_to;
	}

	// If the user is an active member, get out of the way
	if( user_can( $user, 'members' ) ) {
		return $redirect_to;
	}

	// If the user is registered, but not a paying subscriber, send them to the WooCommerce My Account page
	if( user_can( $user, 'registered' ) ) {
		return '/my-account/';
	}

	// If none of the above, get out of the way
	return $redirect_to;
}
Logout Redirect
When a member logs out of your social network, you’ll probably want to redirect them to the homepage. Why? By default, the member will be redirected back to the page they were originally looking at, which will produce a 404 error. So we want to send them to the homepage instead.
Add the following code to your Buddy child theme’s functions.php file.
// Always redirect user to home page on logout
add_filter('logout_url', 'my_logout_url', 10, 2);
function my_logout_url( $logout_url, $redirect ) {

	$args = array( 'action' => 'logout' );
	$args['redirect_to'] = urlencode( get_home_url() );

	$logout_url = add_query_arg( $args, site_url( 'wp-login.php', 'login' ) );
	$logout_url = wp_nonce_url( $logout_url, 'log-out' );

	return $logout_url;
}
My Profile Navigation Link
You’ll probably want to add a “My Profile” link to your main navigation when the user is logged in to the social network. If the user is a paying member, we’ll want to direct them to their BuddyPress profile. If the user is registered but not a paying member, we’ll want to direct them to the WooCommerce “My Account” page instead.
Add the following code to your Buddy child theme’s functions.php
// Add "My Profile" link to main navigation for logged in members
add_filter( 'wp_nav_menu_items', 'my_wp_nav_menu_items', 10, 2 );
function my_wp_nav_menu_items( $items, $args ){

	// If the user is a paying member
	if( current_user_can( 'members' ) ) {
		if( function_exists('bp_loggedin_user_domain') ){
			$profile_link = sprintf( '<li><a href="%1$s" title="%2$s">%2$s</a></li>', bp_loggedin_user_domain( '/' ), __('My Profile') );
		   	$items = $items .  $profile_link;
		}

	// If the user is registered, but not a paying member
	} elseif( current_user_can( 'registered' ) ) {
		$profile_link = sprintf( '<li><a href="%1$s" title="%2$s">%2$s</a></li>', '/my-account/', __('My Profile') );
		$items = $items . $profile_link;
	}

	return $items;
}
Add WooCommerce “My Account” to BuddyPress Profile
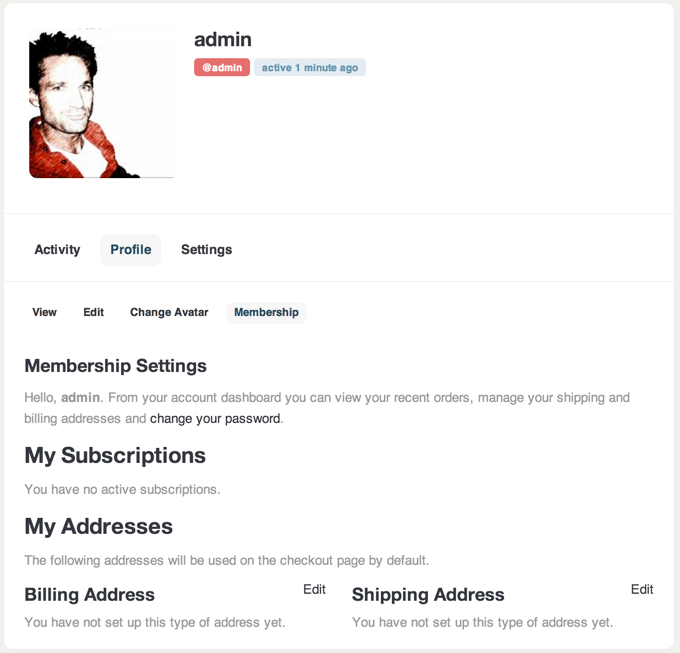
At this point, WooCommerce and BuddyPress have separate sets of profile pages. WooCommerce has a set of pages under “/my-account/” and BuddyPress has a set pages in “My Profile” (/members/membername/ – the BuddyPress pages are dynamically generated for each user). To improve the user experience, we’re going to add some code to make the WooCommerce account pages available inside the members’ BuddyPress profile (see screenshot).
Note: The screenshot shows an administrator account, so no subscription or address information is displayed.
The first code block will add the Membership sub-navigation item to BuddyPress. Add the code to your Buddy child theme’s functions.php
// Add the Membership sub-navigation menu item to BuddyPress' Profile navigation array
add_action( 'bp_setup_nav', 'my_woo_info_nav' );
function my_woo_info_nav() {
	global $bp;
	$profile_link = trailingslashit( $bp->loggedin_user->domain . $bp->profile->slug );
	bp_core_new_subnav_item( array( 'name' => __( 'Membership', 'buddypress' ), 'slug' => 'membership', 'parent_url' => $profile_link, 'parent_slug' => $bp->profile->slug, 'screen_function' => 'bp_woo_profile_subscription_screen', 'position' => 30, 'item_css_id' => 'membership' ) );
}
This code block is called when a user clicks the Membership sub-navigation item. Add the code to your Buddy child theme’s functions.php
// This is the screen_function used by BuddyPress' navigation
function bp_woo_profile_subscription_screen() {
	add_action( 'bp_template_title', 'bp_woo_profile_subscription_screen_title' );
	add_action( 'bp_template_content', 'bp_woo_profile_subscription_screen_content' );
	bp_core_load_template( apply_filters( 'bp_core_template_plugin', 'members/single/plugins' ) );
}
This code block places the actual content into the Membership screen. Note the use of the WooCommerce shortcode at the end. Add the code to your Buddy child theme’s functions.php
// Echo the screen title
function bp_woo_profile_subscription_screen_title() {
	echo 'Membership Settings';
}

// Add the WooCommerce My Account shortcode to the screen
function bp_woo_profile_subscription_screen_content() {
	echo do_shortcode( '[woocommerce_my_account]' );
}
This code block redirects the user back to the BuddyPress profile after saving his/her address information. We only want to redirect the user if they’re a paying subscriber. Why? If the user is merely registered but no longer paying, they don’t have access to the BuddyPress area. Instead, they’ll be using the WooCommerce /my-account/ page to accomplish the same thing – so no redirect. Add the code to your Buddy child theme’s functions.php
// When an address is updated, redirect paying members back to BuddyPress profile
add_action( 'woocommerce_customer_save_address', 'save_address_locate_to_bp_profile' );
function save_address_locate_to_bp_profile() {
	global $bp;

	if( current_user_can( 'members' ) ) {
		wp_safe_redirect( $bp->loggedin_user->domain . $bp->profile->slug . '/membership/' );
		exit;
	}
}
As a final step in the tutorial, jump back over to WordPress -> Settings -> Permalinks and Save.
Now when you view the site and navigate to My Profile -> Profile -> Membership, you’ll see the WooCommerce membership information.
Hosting
There are many hosts to choose from. I moved from WPEngine to Lightning Base and I’ve not been disappointed. Here’s an affiliate link if you’re interested:
Conclusion
First, if you’ve found this tutorial useful, please share it with others who might do the same.
Second, if you’ve followed this tutorial to the end, congratulations, you’re a patient person with a working premium social network!
Finally, there are infinite customization options you can make from here. Depending on the response to the article, more tutorials centered around this solution will be added. Some areas for your own consideration are:
- Member widgets: The Buddy theme provides widgets such as “Recently Active Members” and “Who’s Online”. But you might not want those to show up for non-paying users. Customizations can be made to accommodate this functionality.
- Recent Posts widget: If you create premium posts (i.e. posts that are restricted to paying members), the excerpts won’t display to non-paying users. You might want the excerpts to display in your widget to entice people to join your social network. Customizations can be made to accommodate this functionality.
- Groups 404 plugin: You might have noticed that if a non-paying user attempts to access premium content, they are shown “Page not found”. For a better user experience, itthinx offers a Groups 404 plugin. However, some customization might be required to make this work in a user-friendly way.
- Add a member landing page to display all premium content when a user logs in.
- Replace the BuddyPress “Favorites” functionality with the ability to favorite any post.
Good luck!

















Leave a Reply
43 Comments on "Create a Premium Social Network with WooCommerce"
Wow, what a fantastically comprehensive tutorial Joey!
I hope you guys publish more WooCommerce tutorials. There are so many cool things to do with it when adding in a few extensions.
Great job! I like the way you have described the usage of groups and capabilities, very helpful for those who need a detailed example.
WOW! So cool and detailed tutorial! This is what I’m looking for! Thanks a bunch! \(^_^)/
This is a fantastic guide. Good work. Next step is to include different user types and integrate this with WooCommerce.
What if you’re using WooCommerce to sell Products and BuddyPress for the social aspect? I would like to merge the WooCommerce and BuddyPress “account” pages, similarly to what you’ve done here but we don’t have a subscription service or use the either of the Groups plugins you mention.
Thoughts, tips, ideas?
You shouldn’t have much of a problem running WooCommerce and BuddyPress without Groups. You’ll simply end up with an online store and a free social network. As you indicated, the cross-over comes on the Accounts page. You’ll probably want the members’ BuddyPress profile to reflect purchases. If you follow the steps in ‘Add WooCommerce “My Account” to BuddyPress Profile’, you’ll get very close to a working solution.
Actually, that worked rather well. From the looks of things I only need to change “Membership” to “Orders”, or something similar.
My question now becomes one of if it’s that simple why doesn’t WooCommerce support BuddyPress integration natively? Actually, it’s that and why would someone shell out 60 bucks for the plugin that seem to be the way most folks do it.
Of course I know that all I’m really doing is displaying information from two different tables on one page and they aren’t *really* integrated but I think for most people, that’s probably enough. Right?
Does this also work for integrating woocommerce with bbpress?
The steps have probably changed since this was first written, but the general ingredients and setup should still work. You should be able to secure any content, including bbpress, though I wouldn’t be surprised if a bit of extra setup is required.
Hi Joey,
Thanks for the great tutorial. Am delving into making a woo commerce social site with this tutorial. Are the changes I must note. I believe now the themes and plugins used here have gone through some major updates since your wrote. Kindly update the tutorial. Its great.
Thanks.
Incredibly helpful, and really well written. Thank you so much – this gave me everything I needed to get a concept site up and running. I would never have figured out how to use these plug-ins together otherwise.
Great tutorial !
I just have a question though, this seems a little complex to me although very useful for a marketplace.
Do you know how to list all the seller’s woocomerce products in his profile ?
Here’s a link with an example of what I’m trying to do:
https://creativemarket.com/Borgeslettering
Or maybe if you don’t have the solution do you have any clue on how to achieve that ?
jypy, I’d take a look at WooTheme’s Product Vendors plugin. It might be what you need:
http://www.woothemes.com/products/product-vendors/
Merci Joey de ta réponse,
I already know this plugin because I already used by cons it does not have the products of vendors in their profile as buddypress here : https://creativemarket.com/Borgeslettering
jypy,
Without using the Product Vendor plugin, I think it would simply be a matter of customizing BuddyPress through code – probably not a simple solution.
Hi Joey,
thanks for this great tutorial. I have one question. If the user buys a subscription via woocommerce and i want them to fill out some profile fields from Buddypress in the checkout process under the User Registration (Name/Password) how can i implement that?
Thanks
Patrick
Thank you very much for starters. I really would like to know or how, do I rout back to the registration page when not logged in. Or hide the membership completely when logged out.
I understand now after hours of reading. But is there away to add another code saying to hide the membership tab when logged out. The link gives me a 404 error page doesnt exist only when not signed in. I only used this part Add WooCommerce “My Account” to BuddyPress Profile. I apologize I’m not nothing of a coder but I do try. I just moved from mingle and mingle forum to this on thursday just past. Again thank you so much that for tutorial.
I got It!
Awesome 🙂 Way to go!
I don know what to say but What a great turtorial and exactly what we needed. So many questions sorted out behind the scenes as well, like the group comabililty choice of plugins and more. This is sharing at highest level. Nice work!
Fantastic. Thanks a lot, Jonas.
Hi Joey,
Fantastic tutorial, thanks a lot!
I just found a small bug in the login process though, in the custom_login_redirect function,
If a user is registered but not a paying member, my-account was creating a 404,
please add the root domain in your code:
// If the user is registered, but not a paying subscriber, send them to the WooCommerce My Account page
global $bp;
if( user_can( $user, ‘registered’ ) ) {
return $bp->root_domain . ‘/my-account/’;
}
cheers!
F
Hi – fantastic and thoroughly explained tutorial.
However, I would like to know if it’s possible to keep the BuddyPress activity, members and group pages visible to the public and “customers” (registered and not paying), but restrict access to BuddyPress profiles and therefore write interaction to just “Members”. ie. a logged in “customer” can only read the activity/profiles, but can’t comment and does not have their own profile page.
Hi Joey,
thank you very much for this tutorial. I Just have one question. Why did you choose buddy theme and is that a problem if I prefer Klein theme
Cheers
Boris
Hi Boris.
At the time, I found the Buddy theme to be among the best offered. That is still the case. However, there is no reason another theme can’t be used. Of course, you’d have to be mindful of the steps in this tutorial and make adjustments for a different theme.
Excellent tutorial! Thank you.
Hi Thea,
Unfortunately, it’s not as easy as one would think. It would require some custom code, based on your final setup. The challenge is partly due to BuddyPress code, but also the fact that you have to modify the total member count, activity feed, and account for pagination, all based on your Groups capabilities. Sorry it’s not easier.
Hi Joey,
As someone trying to set-up exactly what you have discussed in this tutorial this was amazing and should be a go to reference guide! I would love to see more tutorials on other functionality to extend this even further.
Thanks for your hard work on this.
Hi Joey,
I am using a different theme so by default there is no ‘login’ button. What additional step would I need to take to set Buddypress up correctly so I can follow the tutorial?
Thanks
What about using “WooCommerce Memberships”? Is that a newer extension or is there functionality missing from it that this (very excellent) guide covers?
Woo Memberships did not exist when this article was published and unfortunately, I’ve not used it. If you do pursue it, make sure you can properly restrict your BuddyPress pages, or any other content for that matter.
Would love to see the Member Landing page for premium content tutorial!