Introduction
Maybe you’ve been creating websites with WordPress for a while, or maybe you’re about to create your first WordPress site. Either way, there are thousands of WordPress plugins and tools to help you get the job done. After purchasing hundreds of plugins, I’ve settled on 3 that help me reliably build every website. I want to save you hundreds of hours by sharing these plugins with you. This tutorial will give you a MAJOR jump start on your WordPress development.
Without further ado, the plugins are:
DesktopServer
DesktopServer is an amazing tool that helps you easily create a WordPress website on your personal computer before you move the site to the live server. By running WordPress and DesktopServer, you can drastically speed up your development. Within seconds, DesktopServer will create a fully functional WordPress website with nothing else to install. What’s more, you can copy/backup the site with a few simple clicks, so you never have to worry about losing changes or trying something new. I currently have over fifty websites running on my laptop through DesktopServer. I absolutely love this product.
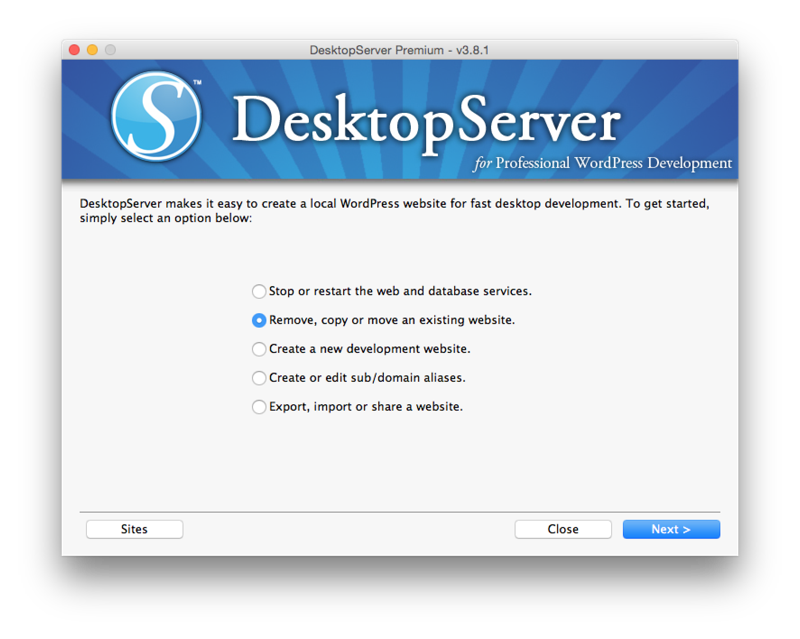
Once you’ve installed DesktopServer (it’s a simple installation), you have several options. We’ll focus on “Create a new development website”. This will start the process of creating a WordPress website on your local computer.
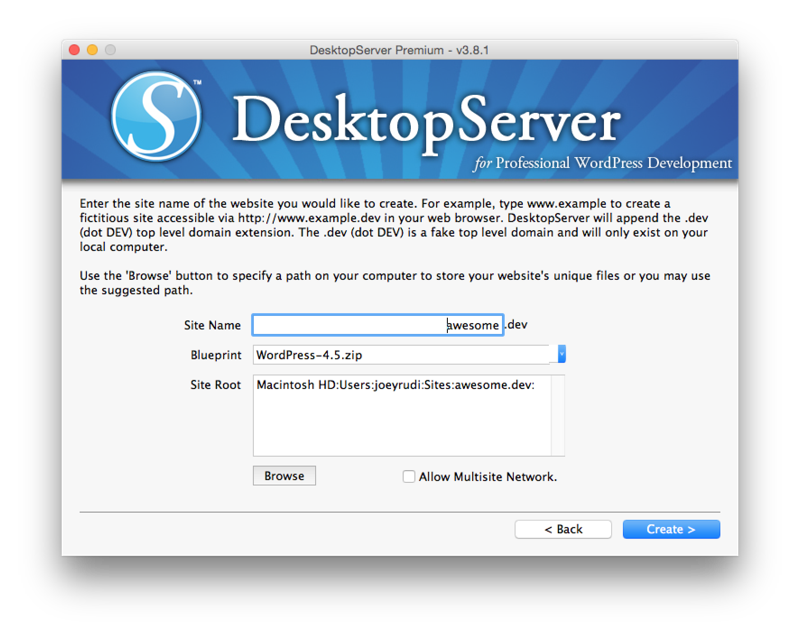
Moving on to the next screen, you’re able to give your local WordPress site a URL. Each DesktopServer website ends in “.dev”. In this case, we’ll specify “awesome.dev” as the URL.
DesktopServer also allows you to choose a WordPress version to use. We’ll leave this at the current default.
Finally, you choose where you want to install the WordPress site on your local machine. This will be the primary directory that holds all of the typical WordPress files.
Once you click the “Create” button, DesktopServer will do its magic. Within a few seconds, you’ll have a fully functional WordPress website at the URL you specified. Just click the provided link to setup your WordPress admin username/password and your basic website details.
You can now log into WordPress and create something awesome on your local development computer. This is a fully functional WordPress site that will eventually make its way to the live Internet.
Fast forward in time and let’s assume you’ve made some changes to your WordPress website, installed some plugins, setup a child theme, and edited some CSS files. Maybe you’re about to install a new plugin that you’re a bit skeptical about and you want to preserve your previous WordPress setup. DesktopServer will easily copy your entire website (files, database, theme, plugins, uploads, etc) to a new URL for backup.
Select the site you want to backup and click next.
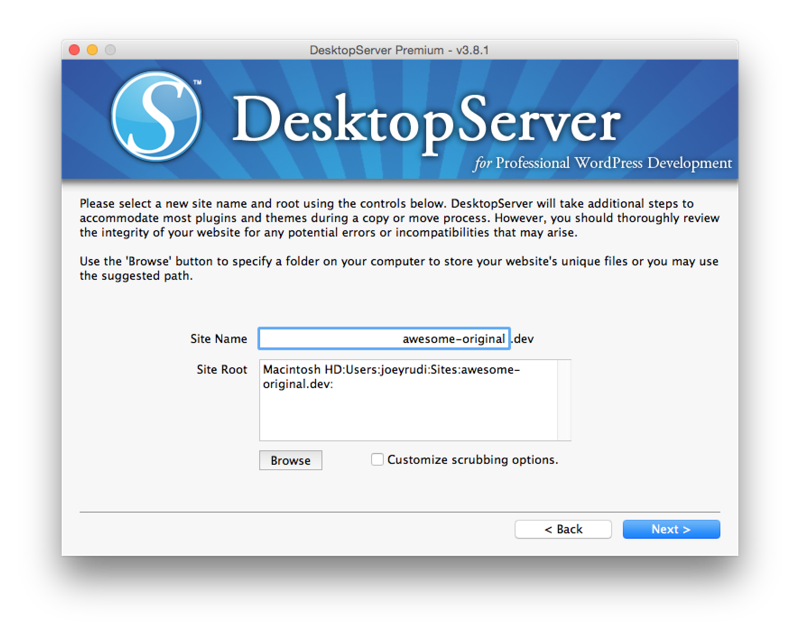
You’ll be given an option to provide a new URL for the backup. In our case, we’ll name it “awesome-original.dev”.
Again, let DesktopServer do its magic and within a few seconds you’ll have two identical WordPress sites: 1) http://awesome.dev; 2) http://awesome-original.dev
Pretty cool, huh?!? DesktopServer also gives you the ability to “move” a website; meaning, rather than copy it, you simply move it to a new URL.
DesktopServer will save you a huge amount of time setting up development WordPress websites. I use it on a daily basis and I’m a very happy customer.
Gravity Forms
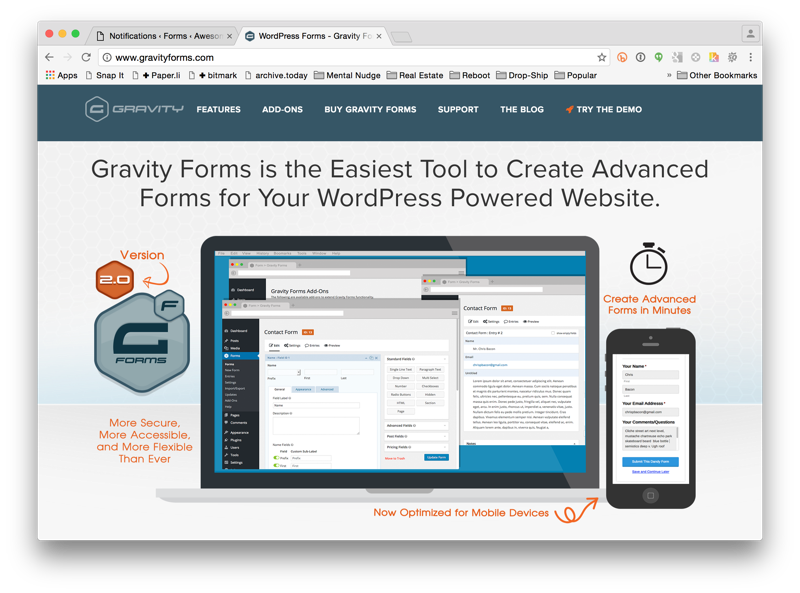
Gravity Forms is an incredible plugin for creating forms of all kinds. The premium version of the plugin gets you about 35 additional add-ons for extending Gravity Forms. I’ve also found that Gravity Forms has a substantial number of hooks and filters for customizing the forms and their behavior. The documentation isn’t bad, either. Gravity Forms has been my go-to suite for several years.
We’re going to build on the awesome.dev WordPress site we created in the DesktopServer section. Using Gravity Forms, let’s add a simple product purchase form. You can do a lot more with Gravity Forms, but this will demonstrate some of the basic functionality.
After you install and activate Gravity Forms, you’ll be asked to create your first form. For this tutorial, we’ll name the form Transparent Toaster Checkout (Why? Because that’s what I found when I searched “awesome products”). Go ahead and save your form.
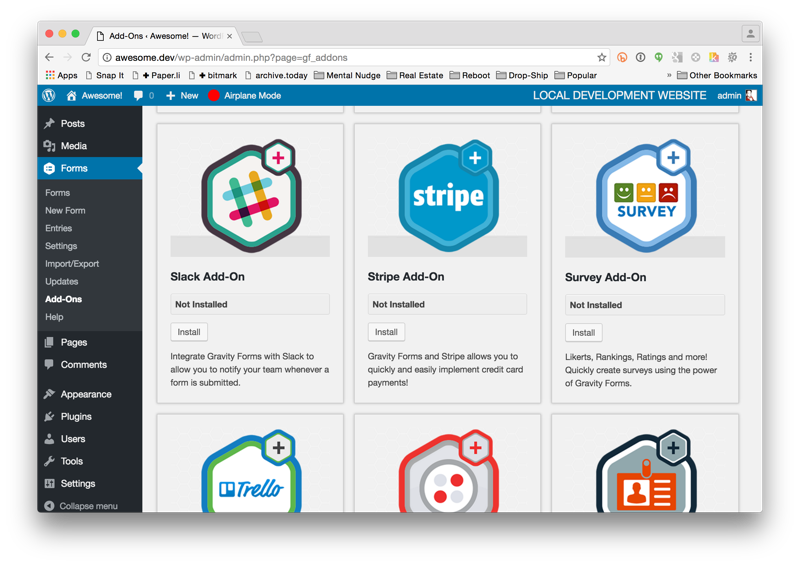
Before we get to the task of adding fields to the new form, let’s install the Stripe add-on for processing credit cards. The Stripe add-on is a great feature and let’s us process cards without the hassle of PCI compliance. So go ahead and install the add-on.
Once installed, add the Stripe keys from your Stripe account (This assumes you’ve created a free Stripe account. If you haven’t, it’s quite easy). BE SURE TO SET THE API TO TEST – you don’t want to process any live transactions! You’ll also need to add a webhook to your Stripe account using the URL and instructions provided by Gravity Forms. The Gravity Forms instructions say to create the webhook on your Live Stripe account, but we’re going to use the Test Stripe setting instead – for now. This wraps up Stripe for the time being, but we’ll come back to the settings before long. So let’s get back to adding some fields to our form.
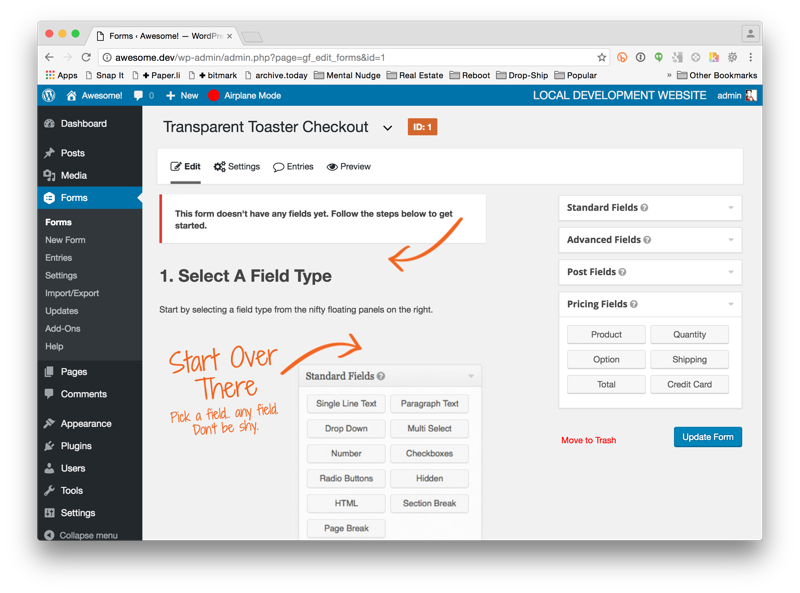
Click on the “Forms” WordPress menu item to see a list of your saved forms, then click on our “Transparent Toaster Checkout” form to being adding fields.
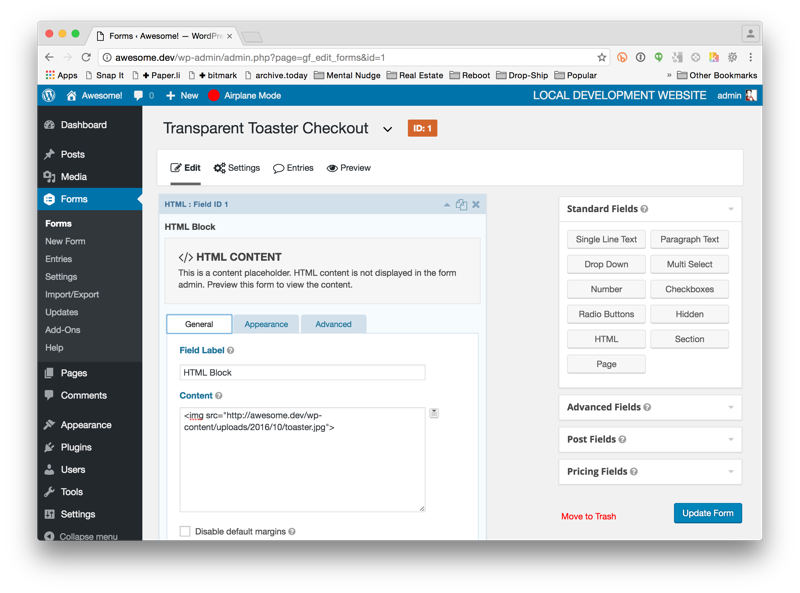
Let’s start by adding an image of our awesome toaster. We do this by adding an HTML field to the form, so click the HTML button. Now click the form field to reveal its settings and add the image from your Media Library (assuming you’ve already uploaded the image).
Let’s take advantage of a nice Gravity Forms feature – adding a CSS class to the field so that we can easily style it. Click on the Appearance tab and add “toaster_img”. The class, toaster_img, is our own class we can use later in our custom CSS to style the field. You can add multiple classes to the field, separated by a blank space. You can also take advantage of some built-in CSS classes provided by Gravity Forms – you can find those classes here. Go ahead and click the Update Form button to save our form, then let’s add another field.
Let’s add the toaster product to the form. Click on Pricing Fields to reveal the buttons, then click Product to add the field to the form. Enter a field label and price, then check Disable Quantity Field and Required. We’re disabling the quantity field because we’re going to use a more robust quantity field.
Click on the Appearance tab and let’s add CSS classes. In the “Custom CSS Classes” field, enter “toaster_product”. Again, toaster_product is our own class that we can use to style the page later. Click the Update Form button to save our form. Now we’ll add a quantity field.
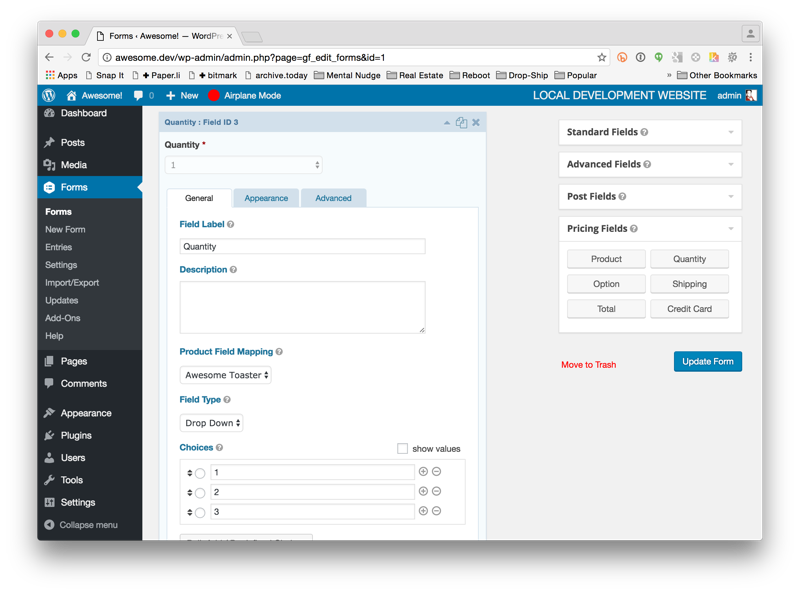
Click Pricing Fields to reveal the options. Click the Quantity button to add the field, then click the Quantity field to reveal its options.
We don’t want the user to have to enter a quantity number, so change Field Type to drop-down. Enter values for each drop-down choice (1, 2, 3). Make the field required, then again, click on the Appearance tab and add the classes “toaster_quantity”. Click Update Form to save the form.
Now let’s add a Total field to the form. This field will display the amount of price x quantity. Click Pricing Fields then the Total button to add the field. Add any CSS classes on the Appearance tab, then click Update Form.
You might have noticed that you can also add some shipping fields to the form. We’ll skip that for now and move to the next section where we’ll collect the buyer’s information.
We want to collect the buyer’s info (and the credit card data) on a second page. In order to do this, we need to add a new page to Gravity Forms. On the right-side, open the Standard Fields box to reveal the buttons and click Page. This will basically add a page break to our form. Click the field to reveal its settings. We’ll leave the settings as-is, but you can get a feel for the various options by clicking through the tabs.
Because we’ve added a new page, we can also configure a few other options. Scroll to the top of the page and you’ll now see a “Start Paging” section. Click that field to reveal its settings. You’ll see that we can add a progress bar to our form and set some options. Our form is only two pages so there’s no point in having a progress bar. I’m turning it off.
Before we can save our form again, we have to add some fields to our second page, so let’s do that in the next section.
Let’s add our buyer’s info to the second page. Click the Advanced Fields to reveal the available buttons. Click the Name button to add it to the form.
The field should automatically be placed below the “Page Break” section and above the “End Paging” section. If not, just click-and-drag the field between the two. This indicates that the Name field will be on the second page.
Click the Name field to reveal its options. You’ll see that you can set various options, but we’ll leave most everything at its default. The one exception is that we want the field to be required, so click the Required checkbox. Go ahead and save the form by clicking Update Form.
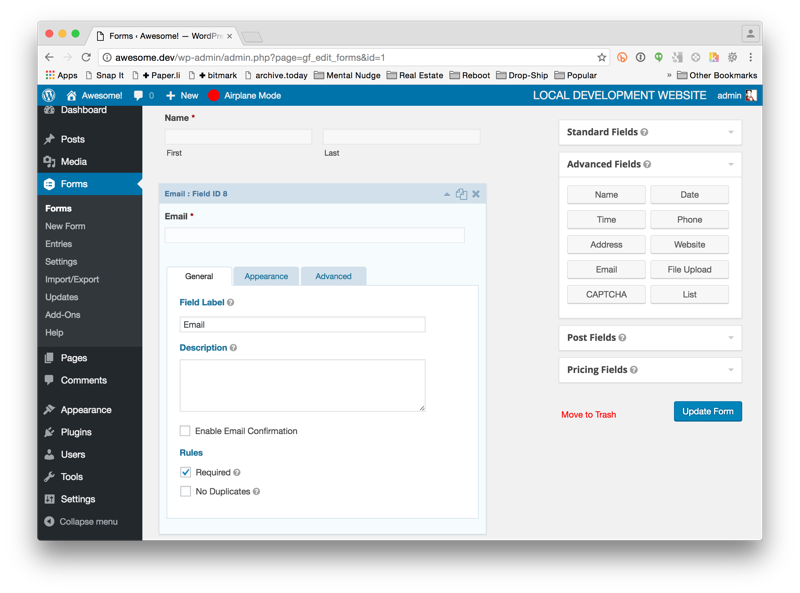
Now let’s add an email field. Under Advanced Fields, click the Email button to add it to the form. If it’s not already, click-and-drag the Email field below the Name field, then reveal its options. Make the Email field required and leave everything else as-is for now. Update your form.
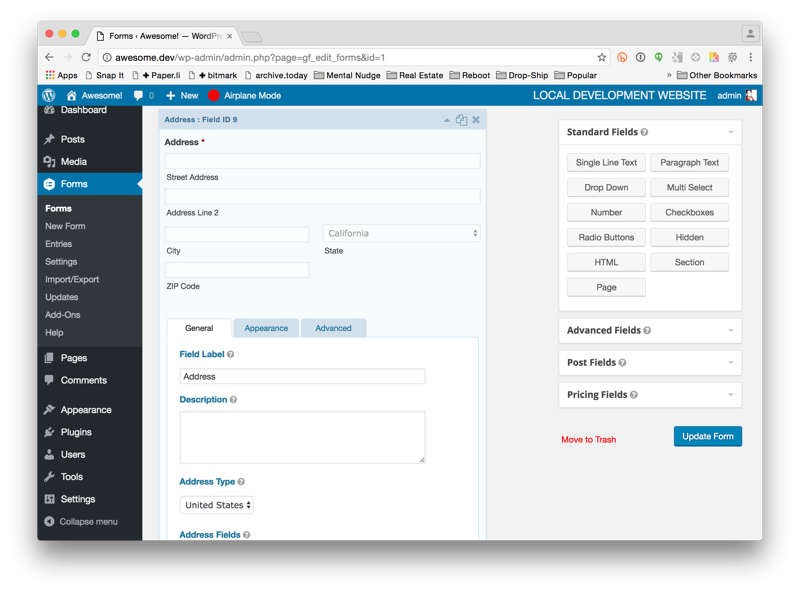
Now we’ll add the shipping address to the form. Under the Advanced Fields section, click the Address button and make sure it’s placed under the previous Email field. Click the field to reveal its settings and configure them as you see fit – but be sure to make the field required. I’m going to set the Address Type to United States and change the Default State to California. Now save your form.
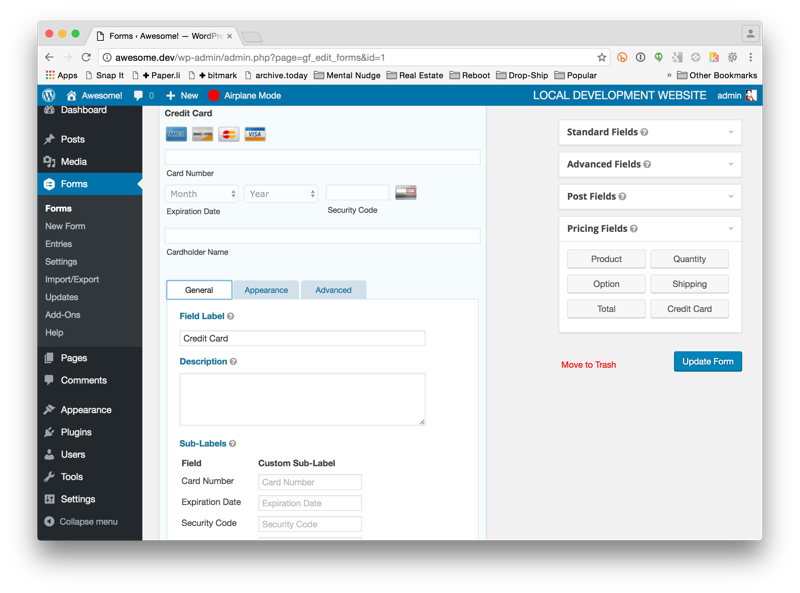
Lastly, let’s add credit card processing to our form. Click the Pricing Fields to reveal the buttons, then click the Credit Card button to add it to the form.
You’ll see several options for the credit card fields, but we’re going to leave most of them at their default. Just be sure to make the field required. One other option to note is under the Advanced tab. We can set an option to force SSL. This will force our form’s page to load under SSL which is required by Stripe. Go ahead and check the box, then click Update Form to save it.
BE SURE TO CLICK UPDATE FORM BEFORE MOVING ON.
Okay… at this point we’ve added the credit card fields to our form, but we haven’t actually hooked them up to our Stripe add-on. Let’s make that happen so that our form can talk to Stripe.
Scroll to the top of the page, hover over the Settings menu, and select Stripe. We’re going to create what’s called a Stripe feed in order to connect our form. Click the “Add new” button.
After you click “Add new”, change the Transaction Type to “Products and Services”. This will reveal another set of options. Notice that Payment Amount is set to “Form Total”. If it’s not, select it. This is actually the form field that we added to the form, which is why you see some other options in the drop-down box.
In the Stripe Recipient section, select Email in the drop-down box. Again, this is the actual email field we added to the form, which is why you see some other options in the drop-down. Gravity forms is good about recognizing your existing fields.
Finally, we’ll send the product name to Stripe in some metadata. Add “product_name” to the Metadata field and select “Awesome Toaster (Name)” in the drop-down. You can add additional metadata if you wish. Click the blue Update Settings button to save the feed.
Our form is pretty much ready to go. We just have to create a WordPress page and add the Gravity Forms shortcode to display the form.
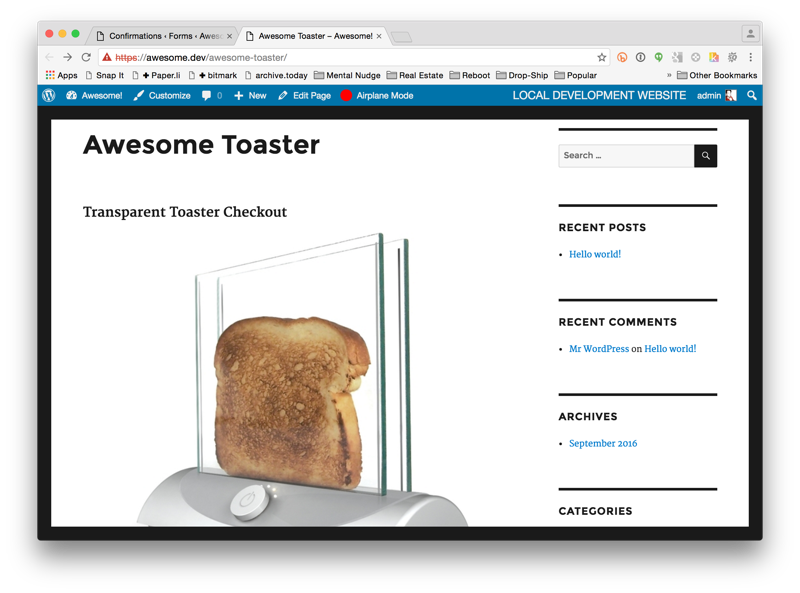
Create a new page in WordPress. I’m naming mine “Awesome Toaster”. When you’re editing your new page, you’ll notice a new button just above the main content area that says “Add Form”. This is a convenient feature for adding the Gravity Forms shortcode. Go ahead and click the button, then select your toaster form. Display the form’s title and/or description if you wish. Go ahead and enable AJAX for the best user experience. Insert the form into your page and save your page. We’re now ready to view our new form. Go ahead an open the page’s URL in your browser (http://awesome.dev, if you’re following this tutorial).
There’s a very good chance you’ll see an SSL error, especially if you’re using DesktopServer as described in the DesktopServer section of this tutorial. Depending on your browser, you’ll have to add an exception for your development website. This will allow the browser to use an uncertified SSL certificate for now. I’m using Google Chrome, so I’m going to click on the ADVANCED link, then “Proceed to awesome.dev”.
Voila! You should see a very basic page with a big product image and the first of your form fields! Change the quantity just to see the fields work and click Next. You’ll be taken to your second form page where you’ll see your name, email, address, and credit card fields.
Go ahead and fill out the fields so that you can run a test transaction. You can use “4242424242424242” for the credit card number, which is a designated test number. Use any security code you wish. Click Submit for the moment of triumph!
On the resulting page, be sure to scroll to the top – it’s a dumb Gravity Forms “feature” that leaves your page half way scrolled down by default. You can change this behavior in your form’s settings (just read up on it). You should see a message that says “Thanks for contacting us! We will get in touch with you shortly.” This indicates that your test transaction was processed!
You can see the entry in Gravity Forms by clicking Forms in the main menu, hovering over the name of your form, and selecting Entries. You can also see that the form was processed by Stripe by logging into your Stripe account and selecting the Test toggle controller. You’ll see a graph totaling your first order. Pretty cool, huh?
There are at least two other Gravity Forms features you’ll want to address. We’ll cover those in the next section.
Two other important Gravity Forms features are: 1) The confirmation message after the form is submitted, and; 2) The email notifications. Let’s look at these.
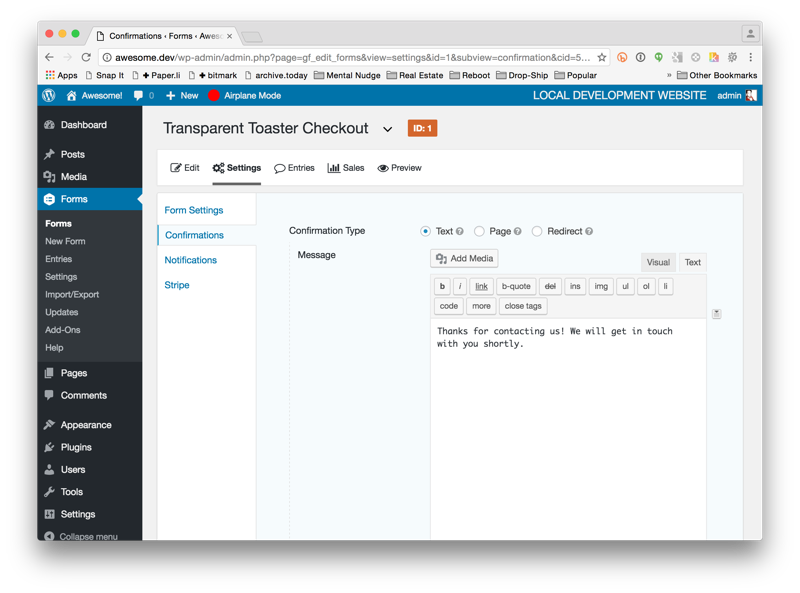
To change the default confirmation message, click the Forms in the main WordPress menu, hover over the form name, and click Settings. In the sub-menu, click confirmations, then click “Default Confirmation”. Here you can change the confirmation message your buyer sees after checkout. You can also include field values using the icon to the right. If you’d rather display a WordPress page or redirect to a URL, you can do that by changing the Confirmation Type.
Gravity Forms also gives you the ability to send email notifications after a form is submitted. Those notifications can go to just the site admin or you can configure it to send to the buyer or anyone else. You can have multiple notifications per form. Of course, your development website might not be setup to actually send emails (especially if you followed the DesktopServer instructions above), so we’ll cover that in a minute.
Click on the Notifications sub-menu, then click on Admin Notifications. Here you can change several options regarding the admin email notification. It’s up to you to configure this screen, but be aware that you can also use values from some of the form fields themselves. Now let’s create the buyer’s notification email.
Go back to the list of notifications and click the Add New button. You’ll see all the form fields to create a new notification. I’m going to name this notification “Buyer Notification”. In the Sent To radio buttons, select “Select a Field”. This will give you the option to select the email field from our form. This way, the notification goes to the email address that the buyer provided. I’m supplying a From name and a subject. Go ahead and add your own message to the buyer and be aware that you can use the form’s values by clicking on the icon to the right. You might end up with message that says something like:
Hi {Name (First):7.3},
Thanks for buying from Awesome Products, Inc. Here is your receipt from your recent order.
{Awesome Toaster (Name):2.1}
{Awesome Toaster (Price):2.2}
{Quantity:3}
{Total:4}
After you save the settings, Gravity Forms will be setup to send notifications to your admin and your buyer. BUT… YOU MIGHT HAVE TO CONFIGURE WORDPRESS TO ACTUALLY SEND EMAIL
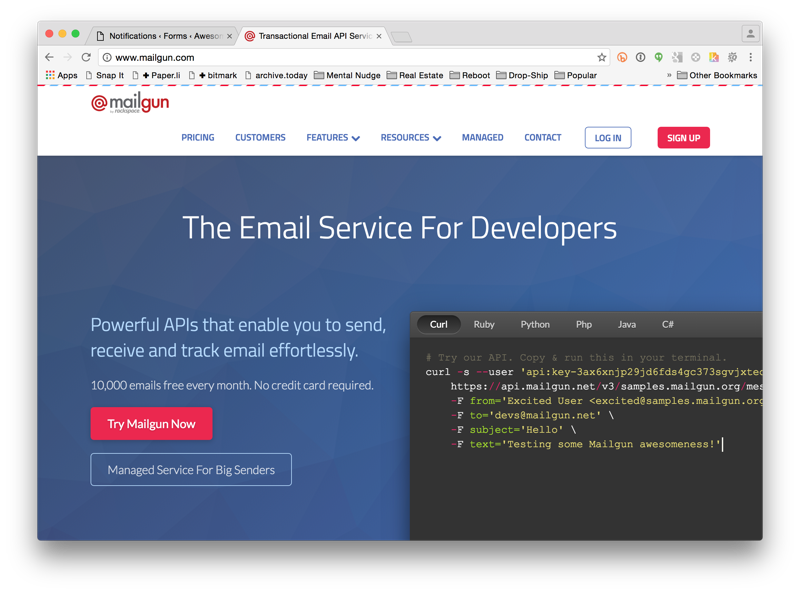
There are many ways to configure WordPress to send email. It’s beyond the scope of this tutorial to discuss the many options, but I personally use Mailgun. Mailgun provides a huge volume of FREE email and they have a WordPress plugin that makes setup a breeze. You’ll be able to send email from your local test server and your live server and it’s about the best setup I’ve seen. I highly recommend Mailgun.
This wraps up the Gravity Forms section of this tutorial. We’ve created a simple checkout form, but the possibilities are endless. Gravity Forms is incredibly robust and after using it to create a few forms, you’ll quickly understand all the moving parts.
Migrate DB Pro
Migrate DB Pro can save you many hours of frustration when it comes time to move your site from the test/development server to the live server. It also comes in very handy when you want to get a fresh copy of your live server and move it to your test server in order to make changes. I can’t overstate this: I love Migrate DB Pro. It has made my life so much easier. (Here’s the affiliate link I mentioned. If you’ve found this tutorial helpful, I’d appreciate it if you’d use the link – but no hard feeling if you don’t.)
My only gripe with Migrate DB Pro is that on its own, it doesn’t move your image files, so you have to manage that as a separate process. They have a product named WP Offload S3 which will move your files to Amazon’s cloud, but I’ve just never tried it. Manually copying the /wp-content/uploads directory is a simple step in my deployment process.
To use Migrate DB Pro, you’ll need to install the plugin on your development server and your live server, both. Once you’ve installed and activated the license on both, moving your site between the two is very simple. This tutorial will walk you through the basic process.
If you’ve been following along in this tutorial, we’ve been using the local URL of http://awesome.dev. Unfortunately, I don’t own the awesome.com domain, so we’re going to switch gears just a bit. In order to provide a true-to-life tutorial, I’m going to deploy this tutorial by using Migrate DB Pro to copy my entire local xd3v.dev WordPress site to my live xd3v.com site and take screenshots along the way.
I’ve installed and activated Migrate DB Pro on xd3v.com and xd3v.dev (the local DesktopServer site). With the exception of this tutorial, both sites are identical. The next step is to make sure that xd3v.dev is allowed to copy itself to the live site, xd3v.com.
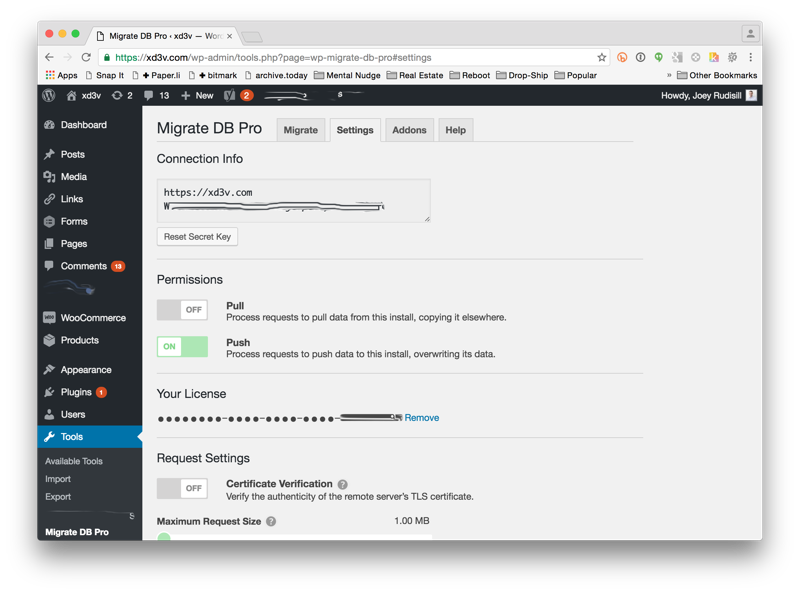
On my live xd3v.com site, I’m going to navigate to the main WordPress menu -> Tools -> Migrate DB Pro. From there, I click on the Settings tab. I’m going to turn on “Push”, which allows an outside site to push (copy) it’s database to this installation. I’ll leave all the other settings as-is. Again, I’ve already set my license key, so now I have a big funky URL in the Connection Info field. I’ll use this URL to push xd3v.dev to xd3v.com. I’m going to copy the Connection Info URL to my clipboard.
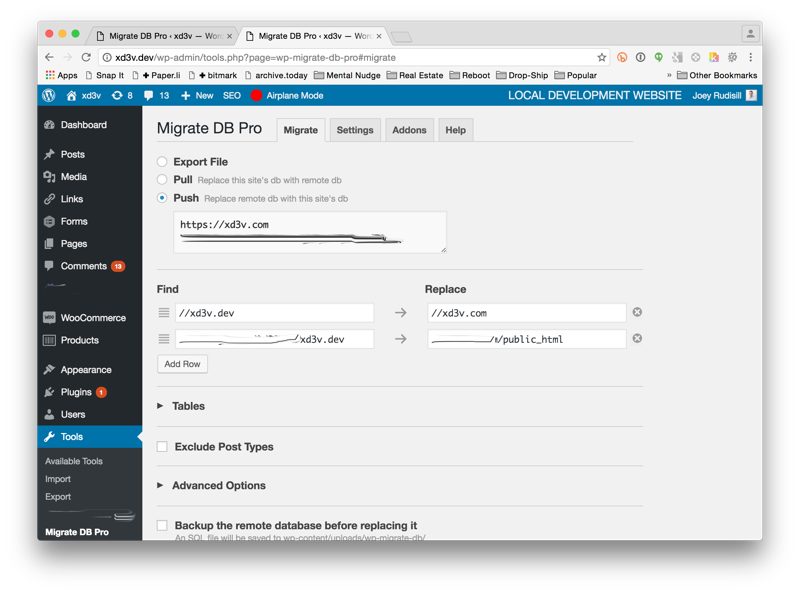
In a new browser window, I’m going to open xd3v.dev and navigate to the main Migrate DB Pro settings (xd3v.dev -> WP Admin -> Tools -> Migrate DB Pro). I’ve already activated my license key, so I’m just going to select the “Push” radio button. That will reveal a field where I can paste the Connection Info URL I obtained from xd3v.com. Once I paste the URL, Migrate DB Pro automatically attempts to connect to xd3v.com. Once it connects, I see several options for copying my site from xd3v.dev to xd3v.com. I’m going to leave every settings as-is because it will work with all the defaults. You can read up on the various settings.
All that’s left is to press the “Push” button at the bottom. This will start the process from copying the entire WordPress database from xd3v.dev to xd3v.com. Part of the magic of Migrate DB Pro is that as it copies, it will search the database for all occurrences of xd3v.dev and replace it with xd3v.com. This makes for a functional, clean copy that works instantly.
I press the “Push” button and away it goes. Once the process finishes, this tutorial will be live on xd3v.com. Pretty cool, huh?
As I mentioned before, Migrate DB Pro does not copy the files in the /wp-content/uploads directory. So as a final step, I’m just going to use my FTP program to copy this tutorial’s images from my development computer to the live /wp-content/uploads directory.
Conclusion
I hope this tutorial on DesktopServer, Gravity Forms, and Migrate DB Pro has been helpful. If you get stuck, leave a comment below. You can also contact me for any WordPress professional services at contact@xd3v.com.
Good luck!













Leave a Reply
Be the First to Comment!